
Commercial Solar LED Siren Lighting and Solar Windsocks


Commercial Solar LED Siren Lighting and Solar Windsocks
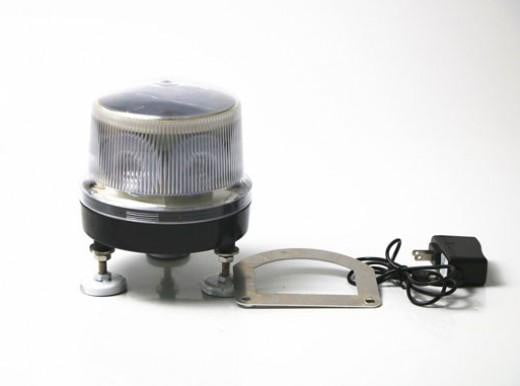
The ICAO 12-feet lighted windsock Helipad Airport Wind sock with solar Obstruction light is used to visually indicate the wind direction for airports,helipads,Hospitals,Military Bases and Corporate Headquarters.The weather vane includes a 12-feet wind sock, a solar obstruction light and a solar internal floodlight. It complies with FAA AC 150/5345-27E.
Check more details:
Features and Benefits
12 feet(3.6 meters),Size 2 Red/White sock.
Detachable stainless steel bracket for sock.
Solar panel 7.2Wp, replaceable Lithium battery 16Ah/7.4V.
The working mode is chosen by the remote controller. Lens is poly-carbonate with anti-UV which is produced by Bayer.
Completely solar self-contained and waterproof IP65.
1.How to choose the working mode?
The working mode is chosen by the remote controller that has four keys---1,2,3 and 4.
• Key 1: The obstruction light and floodlight are turned ON;
The working mode is chosen by the remote controller that has four keys---1,2,3 and 4.
• Key 1: The obstruction light and floodlight are turned ON;
When these night landing lights are needed,the mode has to be used.
• Key 2: The obstruction light is turned ON only;
When there are not flying tasks at night,this working mode is the best choice.
• Key 3: The floodlight is turned ON only;
• Key 4: The two lights are turned OFF;
When the wind vane isn't used for a long period,the mode should be chosen.
Please note the remote controller has a switch on its side and turn off this switch after operated.
2. How to install the bracket of the windsock?
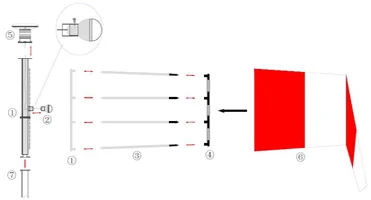
The configuration of the wind vane can be seen in Fig. Configuration in which the numbers ①~⑦ represent the following meaning:
• Key 2: The obstruction light is turned ON only;
When there are not flying tasks at night,this working mode is the best choice.
• Key 3: The floodlight is turned ON only;
• Key 4: The two lights are turned OFF;
When the wind vane isn't used for a long period,the mode should be chosen.
Please note the remote controller has a switch on its side and turn off this switch after operated.
2. How to install the bracket of the windsock?
The configuration of the wind vane can be seen in Fig. Configuration in which the numbers ①~⑦ represent the following meaning:
① Stainless Steel Bracket
② LED Floodlight
③ Stainless Steel Connector ④ Stainless Steel Support
⑤ Solar Obstruction Light
⑥ Windsock
⑦ Pole
The assembly steps for each component are as follows:
Step 1: Connect ① and ④ with ③ ;
Please note: Connecting ③ to ① and connecting③ to④ must be synchronized.
Step 2: Connect ② to ① and fasten with a setscrew. (Note: Please use mild strength)
Step 3: Connect conductors between ⑤ and ①, fasten using screws (Note: please connect correctly by connecting the same color conductors (e.g. red to red; black to black))
Step 4: Insert the frame consisted of ①, ③ and ④ into ⑥, fasten with ropes.
Step 5: Connect the assembly from step 1 to 4 with ⑦ using screws.Yes,you can easily turn off this lantern by a touch switch in the side of it.We also suggest that you turn off it when it isn't used for a long time.So it is only charged during the day and discharged at night.


Connect us for more styles and best price for bulk order.